
Quick Answer: How to Make an Explainer Video with AI
To learn how to make an explainer video with AI, first define the audience and one key takeaway. With JoggAI, you can start from a topic, URL, document, or PDF, then review the AI-generated script outline and storyboard scene by scene. Choose an animation style, voice, video model, and captions, render the video, and review the final result before downloading or publishing it.
JoggAI shows the estimated credit cost before rendering, making it easier to choose settings that fit your budget.
What Is an Explainer Video?
An explainer video is a short, focused video that helps a specific audience understand an idea, process, product, or service. It combines narration with animation, diagrams, labels, demonstrations, or other relevant visuals.
A useful explainer does more than list information. It answers a clear question in a logical order:
-
What is it?
-
Why does it matter?
-
How does it work?
-
What should the viewer understand or do next?
Explainer videos can support classroom lessons, product education, employee training, customer onboarding, public information, and social content. Whatever the use case, each line and scene should contribute to one main takeaway.
The AI Explainer Video Production Process
The explainer video production process can be organized into six steps:
| Step | What you do | What you produce |
|---|---|---|
| 1. Define the brief and choose a style | Choose the audience, goal, takeaway, and visual style | A focused brief and selected style |
| 2. Add the source | Enter a topic or add a URL, document, or PDF | A source-based project |
| 3. Review the outline | Organize the explanation into clear sections | An approved Script Outline |
| 4. Check the storyboard | Review the script and purpose of every scene | An approved scene plan |
| 5. Configure and render | Select the style, voice, model, resolution, and captions | A rendered draft |
| 6. Review and publish | Check facts, visuals, audio, captions, and continuity | A finished explainer video |
Step 1: Define the Audience, Goal, and One Template
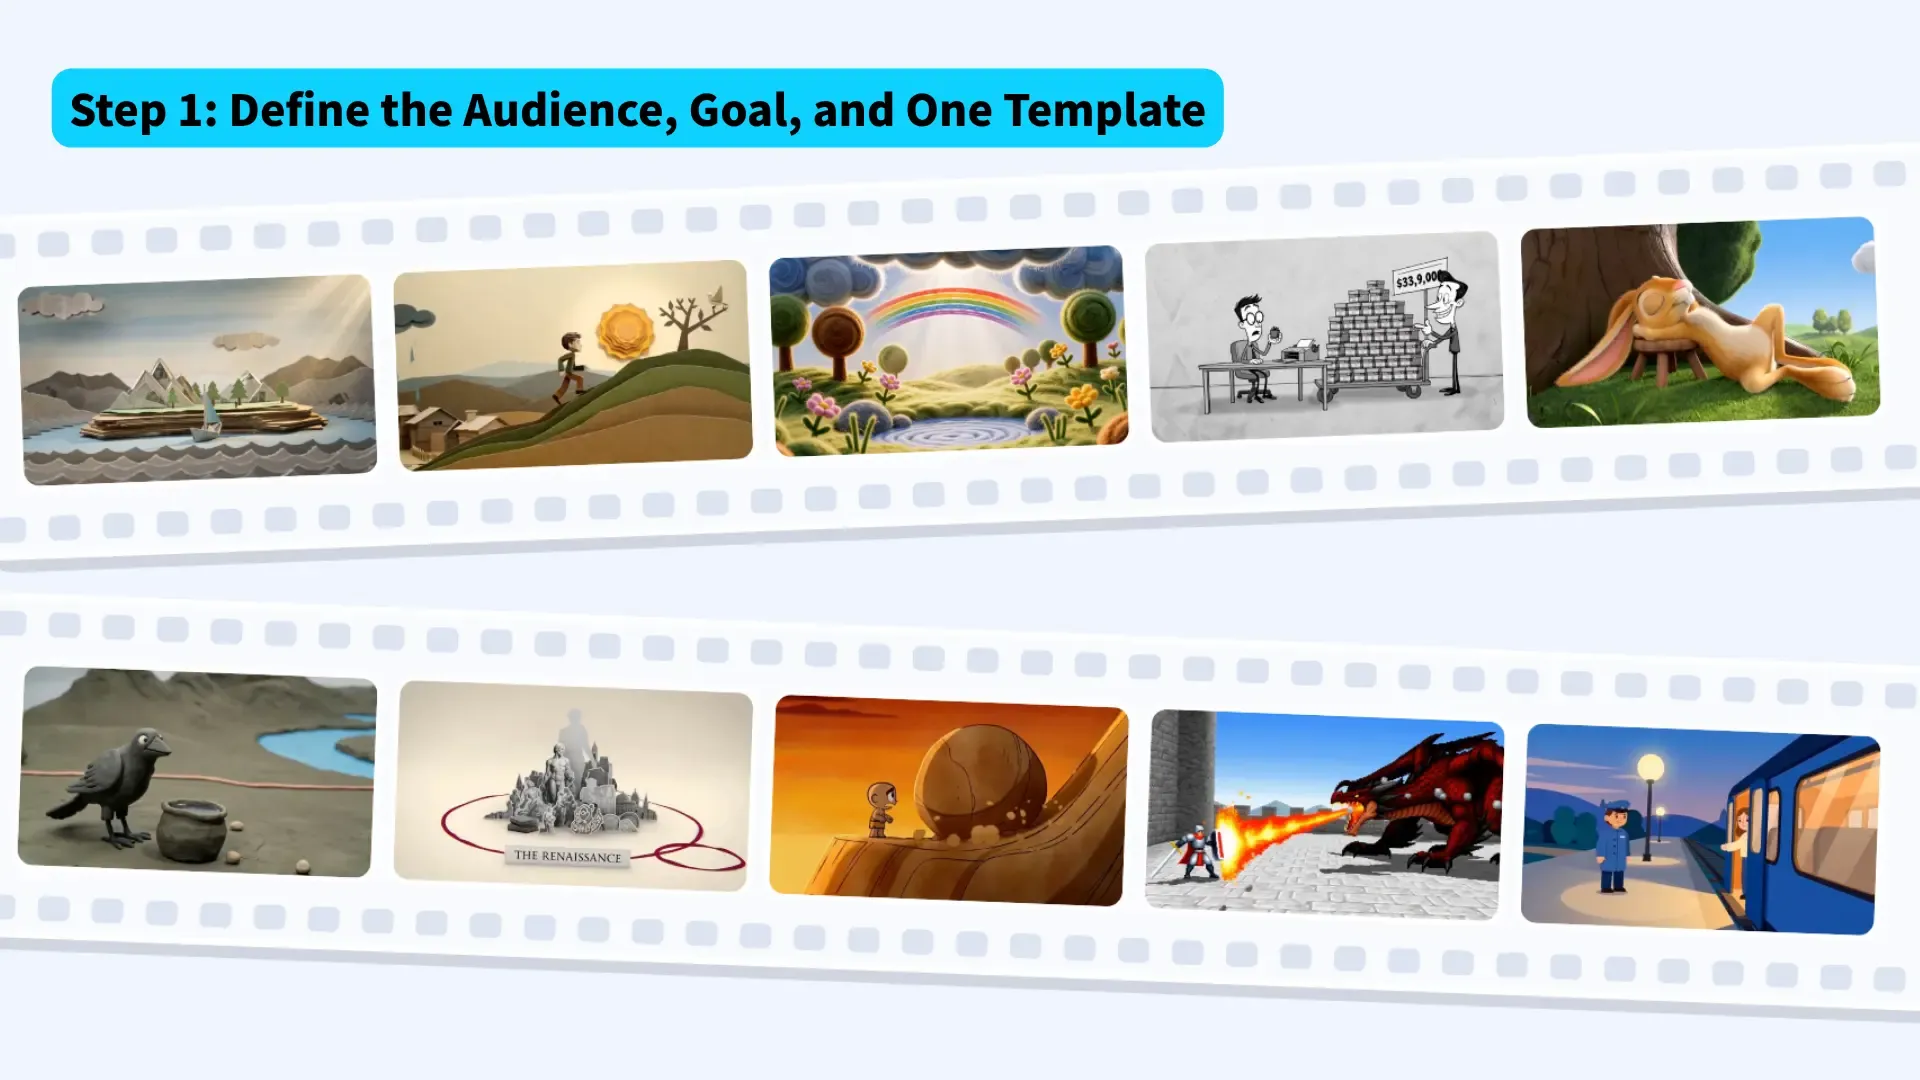
Start by deciding who the video is for and what they should remember after watching. One clear takeaway keeps the video focused and prevents the script from covering too much information at once.
Canva’s video script guide recommends defining the audience, purpose, and platform before outlining the content. A simple brief can include:
-
Audience
-
Topic or problem
-
One key takeaway
-
Tone
-
Target length
-
Desired next action
Once the goal is clear, choose how the video should look. Above the input box, JoggAI displays animated previews of its visual templates. You can compare the styles at a glance and click the one that best matches your topic and audience.
Next, choose how the scenes will be generated:
- Fully animated: Generates each scene as a motion video, with movement within the scene.
- Frame by Frame: Builds each scene from still images, creating a more static, image-led style.
You can also set the aspect ratio, video length, output language, and Network search. JoggAI supports 9:16 and 16:9 formats and video lengths from 30 to 180 seconds.
For the photosynthesis example, we selected a soft animated visual template, Fully animated, 16:9, 60 seconds, English, and Network on.
Step 2: Add a Topic, URL, PDF, or Source File
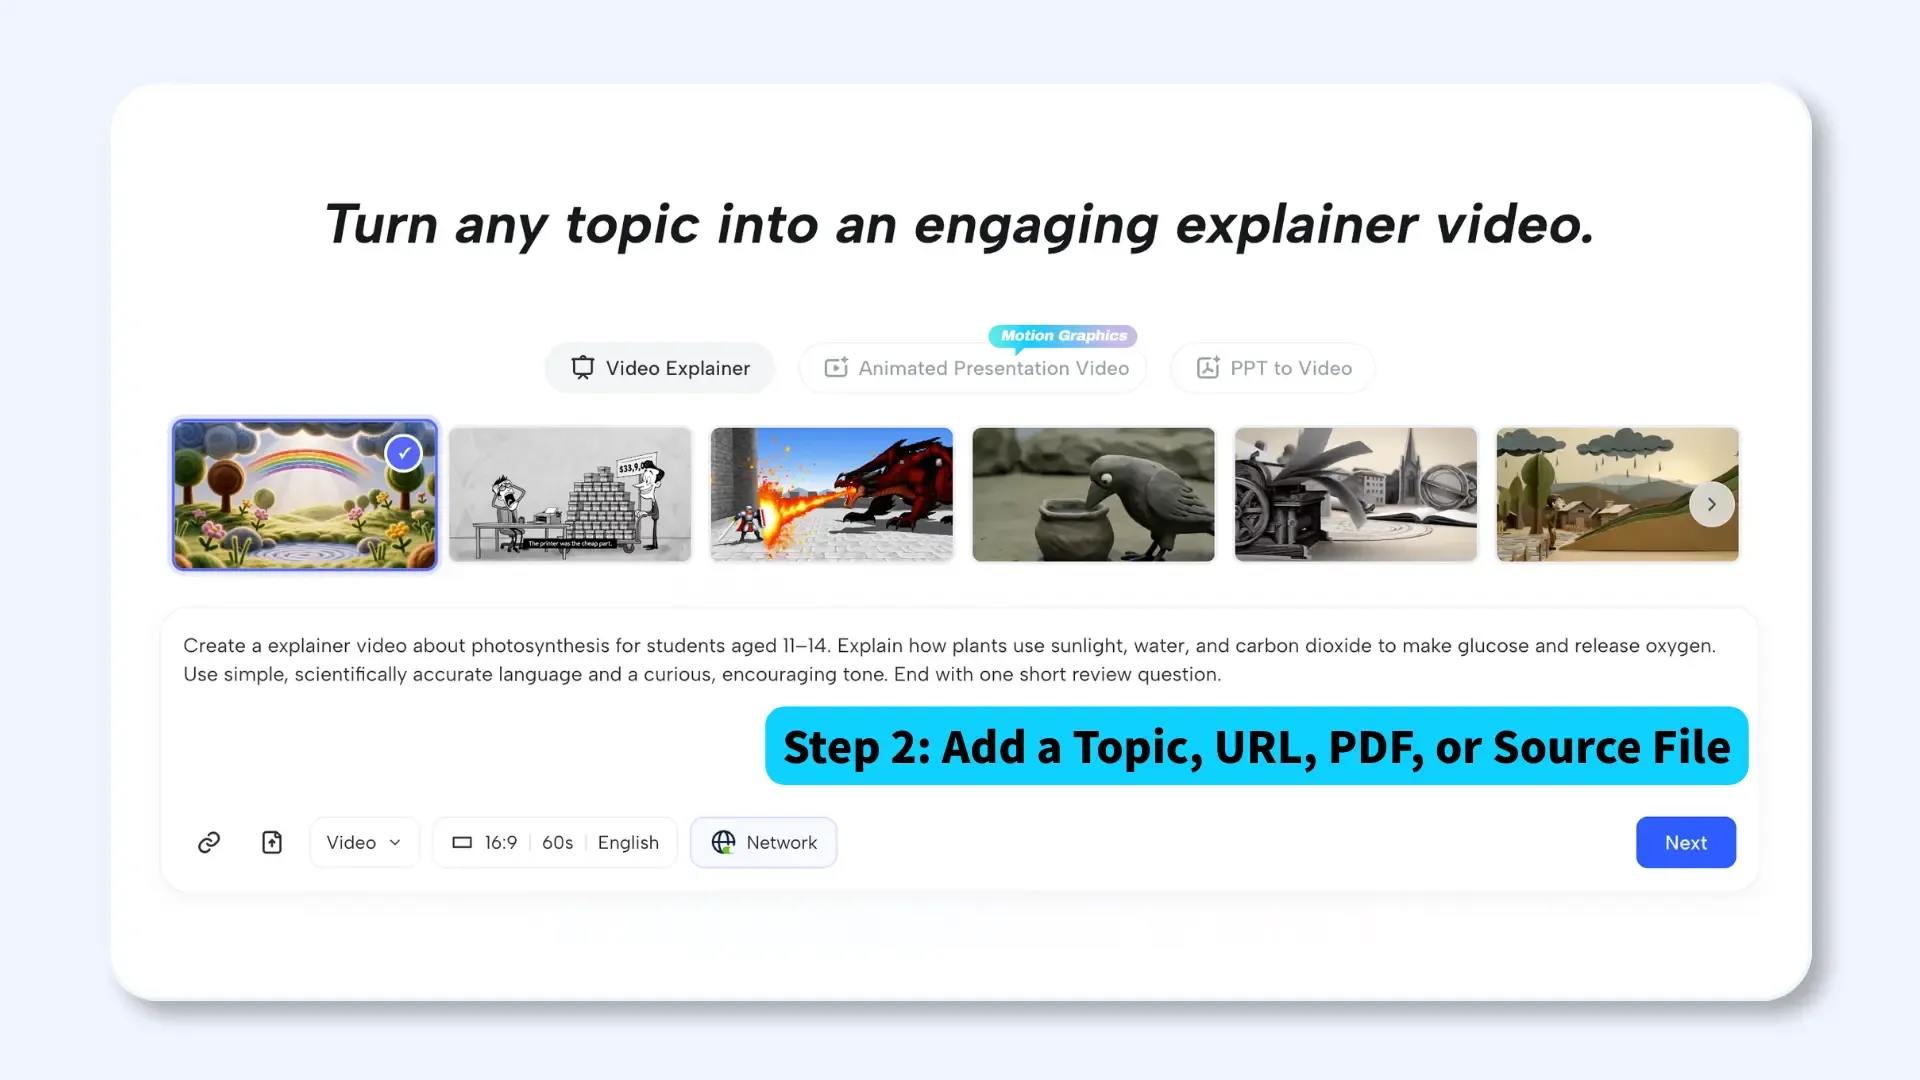
After choosing the video style and basic settings, tell JoggAI what the video should explain. You can enter a topic directly or add a URL, document, PDF, or multiple source files.
With JoggAI’s AI Explainer Video Maker, you can begin with a topic, URL, document, or PDF and add multiple source files. JoggAI also provides dedicated URL to video and PDF to video workflows.
For the photosynthesis example, we entered this topic prompt:
Create an explainer video about photosynthesis for students aged 11–14. Explain how plants use sunlight, water, and carbon dioxide to make glucose and release oxygen. Use simple, scientifically accurate language and a curious, encouraging tone. End with one short review question.
After entering the topic or adding the source materials, click Next to generate the Script Outline.
Step 3: Generate and Edit the Explainer Video Script Outline
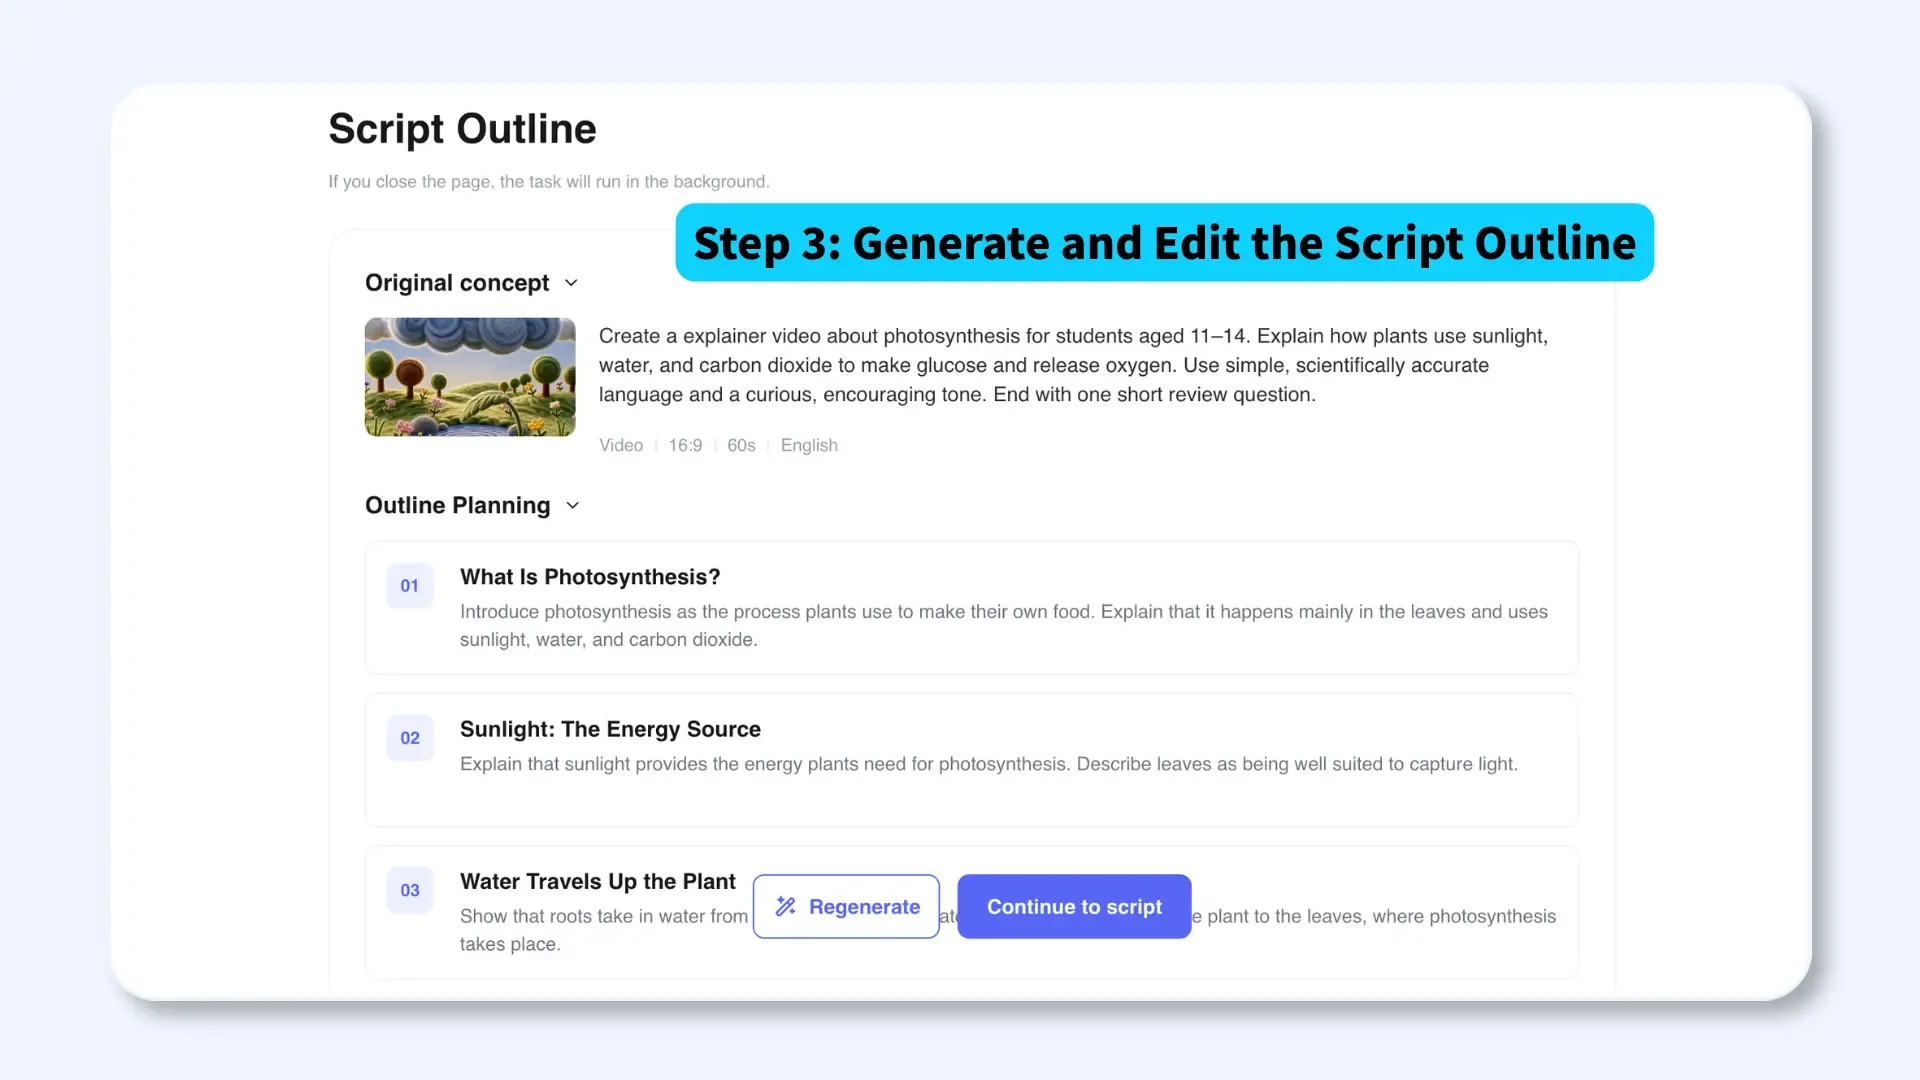
The outline turns the brief into a sequence of ideas before the full explainer video script is created. This is the best point to fix missing information, weak order, or unnecessary sections.
JoggAI generates an editable Script Outline from the topic and source material. You can change the outline yourself or regenerate it before moving to the storyboard. If you need help drafting separately, JoggAI also provides an AI Script Generator.
The photosynthesis prompt produced this outline:
-
What Is Photosynthesis?
-
Sunlight: The Energy Source
-
Water Travels Up the Plant
-
Carbon Dioxide Enters the Leaf
-
Glucose and Oxygen Are Made
-
Quick Review
The sequence introduces the process, explains its main inputs and outputs, and ends with a short review. It matched the intended lesson, so we continued without changing or regenerating it.
Step 4: Review the Explainer Video Storyboard Scene by Scene
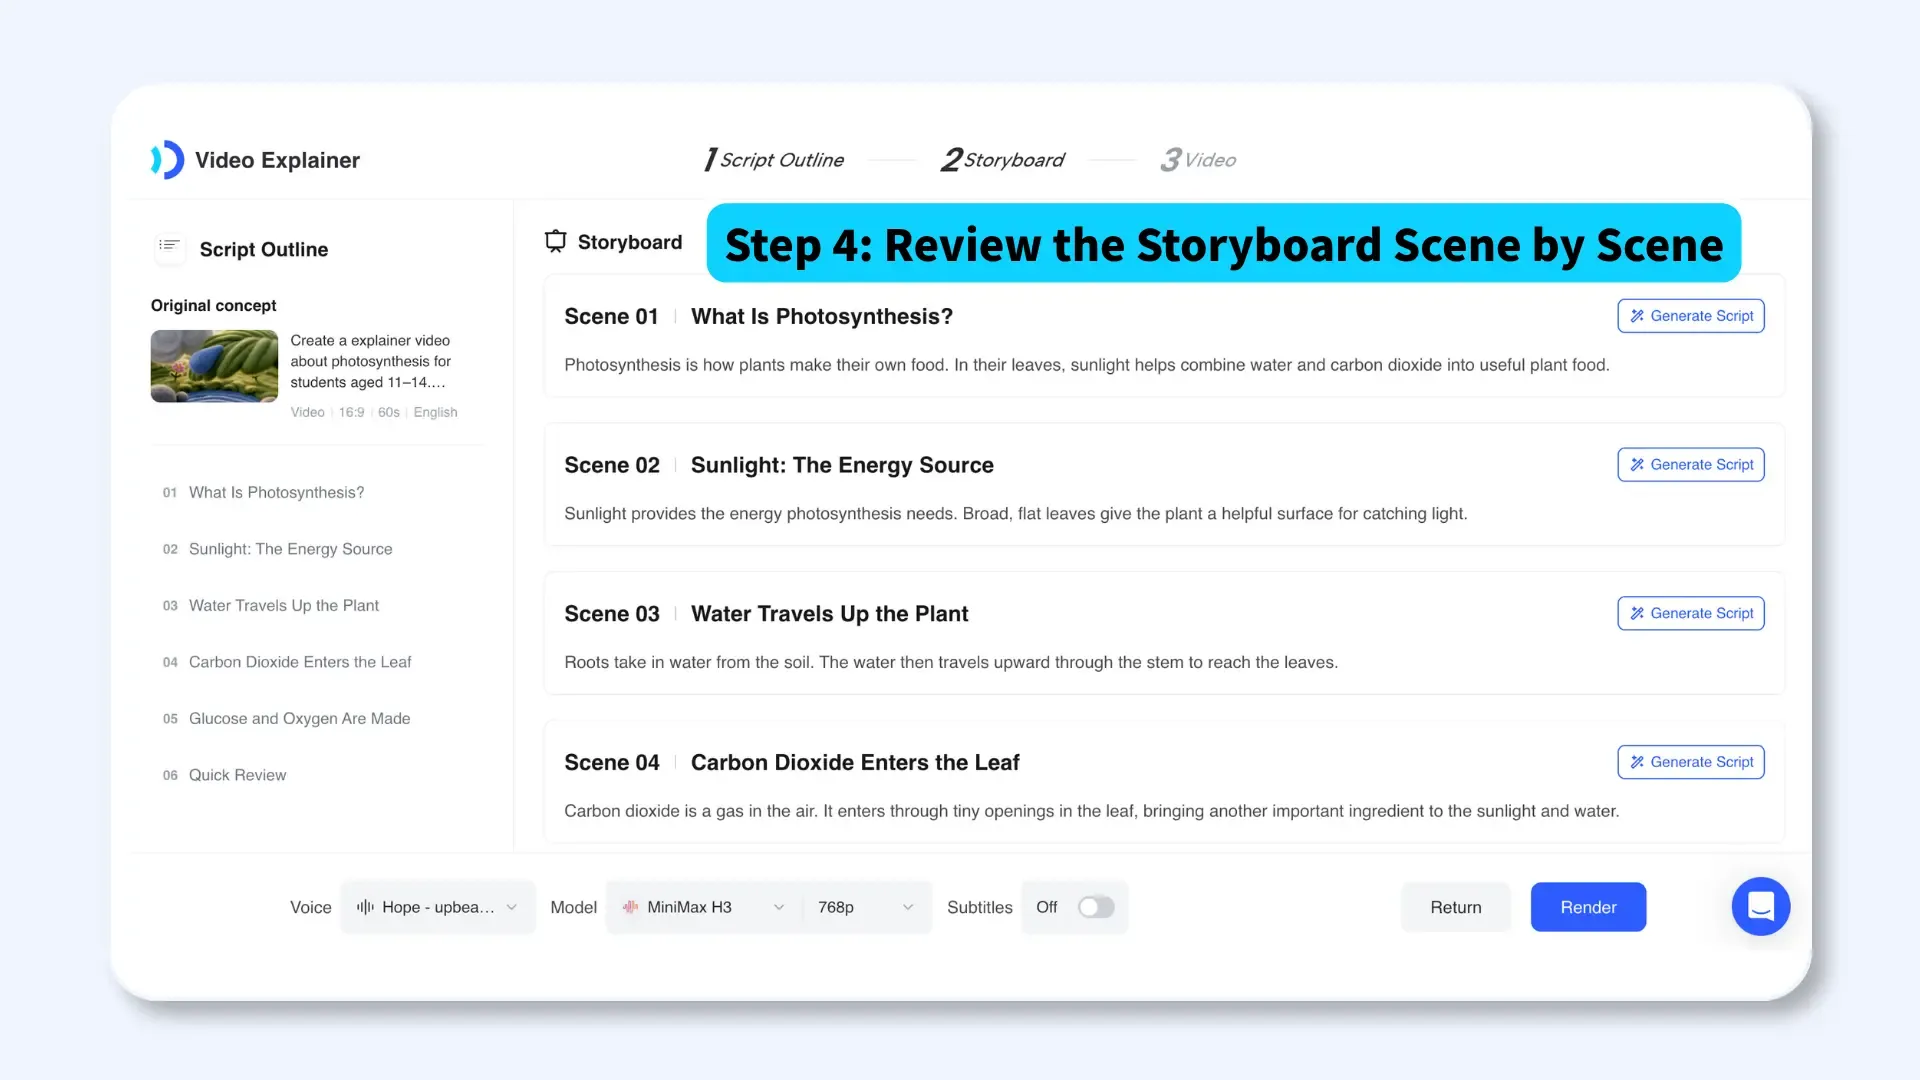
An explainer video storyboard connects each part of the narration with a scene. Reviewing it scene by scene helps you catch unclear wording and visuals that do not explain the spoken message.
Adobe’s storyboarding guide describes a storyboard as a visual representation of a script that establishes how a story will unfold. In JoggAI, the storyboard displays a title and script for each scene. You can edit the text directly or ask AI to generate another version of an individual scene script.
Check four things in every scene:
-
Narration: Does it express one clear idea in spoken language?
-
Visual purpose: What should the viewer see to understand that idea?
-
Continuity: Do the style, subject, colors, labels, and terminology remain consistent?
-
Transition: Does the scene connect naturally to the next one?
For example, “Water Travels Up the Plant” should show water moving from the roots toward the leaves. “Glucose and Oxygen Are Made” should help viewers distinguish the glucose produced by the plant from the oxygen released into the air.
Step 5: Choose the Voice, Video Model, Captions, and Render
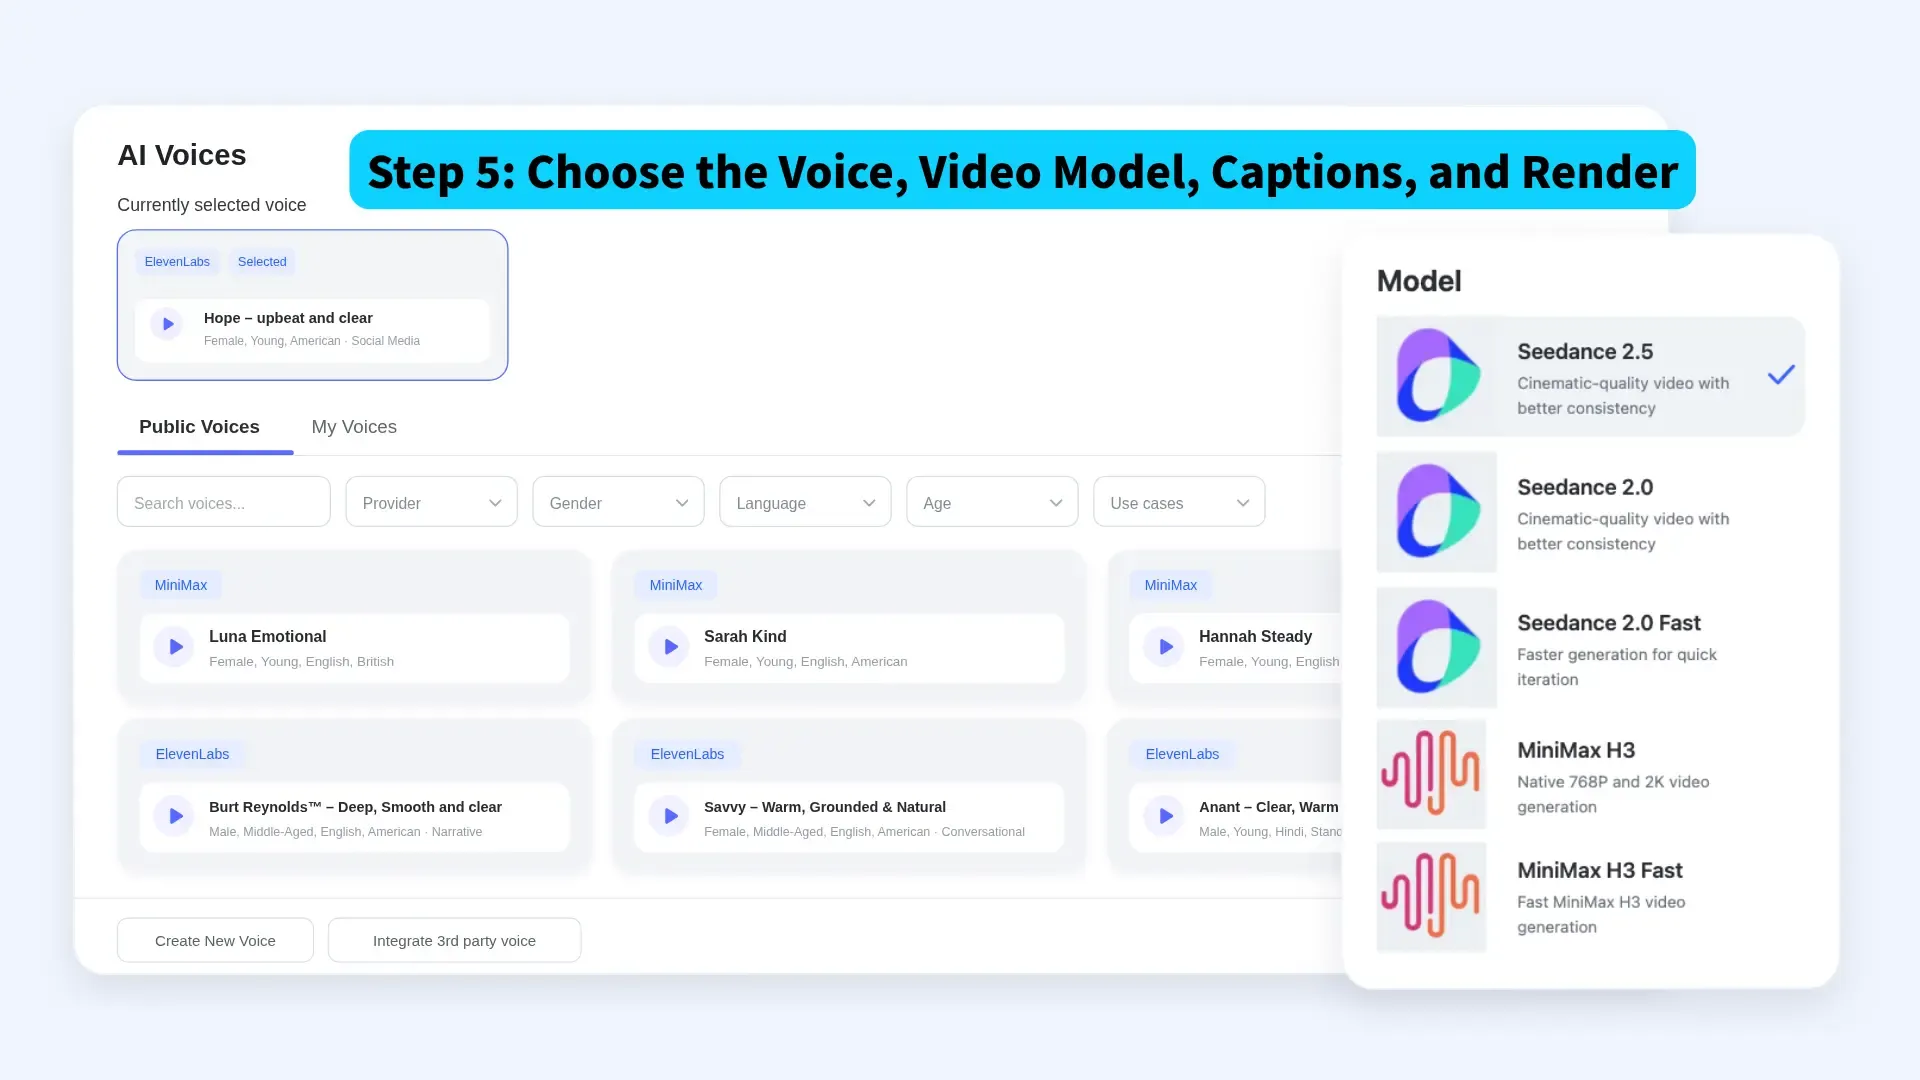
JoggAI lists 10,000+ AI voices across 50+ languages, including voices from MiniMax, ElevenLabs, and JoggAI. Preview the voice and choose one that matches the language, audience, subject, and tone. Technical terms and proper names are worth testing before the final render.
You can then choose a video model, resolution, and subtitles. The Explainer Video workflow includes Seedance 2.0, Seedance 2.5, MiniMax H3, and faster model options. JoggAI describes Seedance 2.5 as designed for stronger continuity and smoother motion, while MiniMax H3 Fast is positioned for faster, lower-cost iteration.
For the photosynthesis video, we selected:
-
Voice: MiniMax Luna Emotional
-
Video model: Seedance 2.5
-
Resolution: 480p
-
Subtitles: On
Before clicking Render, JoggAI displayed an estimated cost of 7,260 credits: 7,200 credits for six video scenes and 60 credits for the first-frame image. The amount charged matched the estimate.
W3C’s caption guidance explains that captions should include spoken content and relevant non-speech audio. Review automatic captions for terminology, punctuation, timing, and line breaks before publishing.
Step 6: Review the Video and Publish
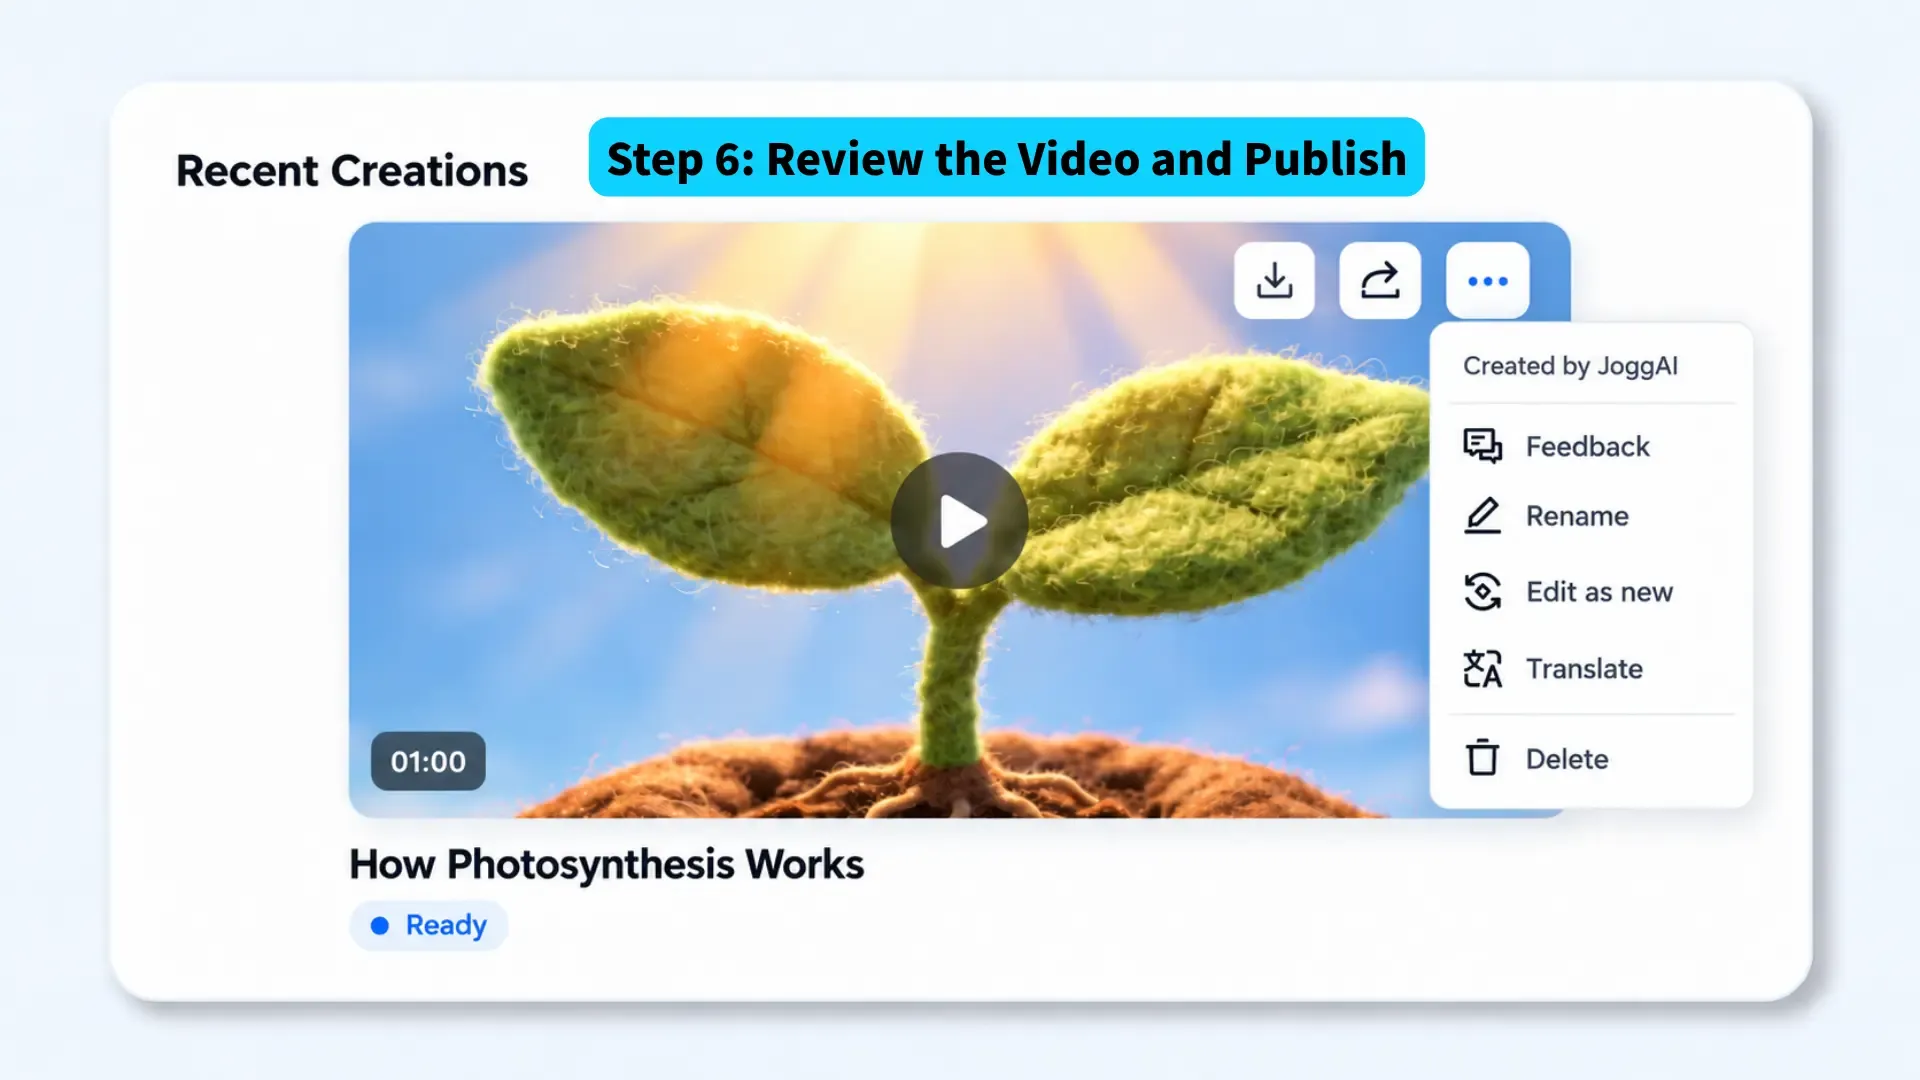
Watch the rendered video from beginning to end before publishing. Check the narration and visuals together rather than reviewing either one in isolation.
Use this final checklist:
-
Facts: Are the definitions, names, numbers, and relationships accurate?
-
Visuals: Does each scene show the right object, action, and relationship?
-
Continuity: Do the style, subjects, colors, and motion remain consistent?
-
Narration: Are the pronunciation, pace, pauses, and tone appropriate?
-
Captions: Do they match the narration and appear at the right time?
-
Delivery: Is the aspect ratio and output quality appropriate for the destination?
The photosynthesis video appeared in Recent Creations after rendering. It could be downloaded or published to TikTok and YouTube. The additional menu also included Feedback, Rename, Edit as new, Translate, and Delete.
Selecting Edit as new opened the JoggAI editor. We could modify the text or script, voice, and subtitles while keeping the existing continuous animation. Scene media could not be replaced, individual images could not be regenerated, and the scene order and duration could not be changed.
After publishing, use audience data to improve future videos. YouTube’s audience-retention report highlights intros, top moments, spikes, and dips that can reveal where viewers leave, skip, or rewatch.
What to Look for in an AI Explainer Video Maker
Choose an AI explainer video maker based on how well it supports your workflow, not simply on the number of templates it offers.
| Criterion | What to check |
|---|---|
| Inputs | Can you start from a topic, URL, document, PDF, or multiple files? |
| Script control | Can you review and change the outline and individual scene scripts before rendering? |
| Storyboard | Can you see how the narration is divided scene by scene? |
| Visual consistency | Can the tool maintain a coherent subject and style across scenes? |
| Voice and language | Can you preview voices and choose the right language, accent, and tone? |
| Captions | Can you enable and correct subtitles? |
| Revisions | What can be changed before and after rendering? |
| Cost | Does the tool show the expected credit cost before generation? |
| Rights and privacy | Do its terms fit your source material and publishing plans? |
For detailed product comparisons, use a dedicated AI explainer video maker comparison rather than turning a how-to guide into a tool list.
What Can You Edit Before and After Rendering in JoggAI?
JoggAI provides the most structural control before rendering, while Edit as new supports a smaller set of finishing changes afterward.
| Before rendering | After rendering with Edit as new |
|---|---|
| Edit or regenerate the Script Outline | Edit the text or script |
| Edit or regenerate individual scene scripts | Change the voice |
| Review the storyboard and scene order | Edit subtitles |
| Choose the animation style, voice, model, resolution, and subtitles | Keep the existing continuous animation |
| Set the aspect ratio, language, duration, and Network option | Scene media, order, duration, and individual generated images cannot be changed |
If the explanation or scene structure is wrong, correct it before rendering. Use Edit as new when the finished video only needs changes to wording, voice, or subtitles.
Explainer Video Best Practices
These principles help teams make explainer videos that are easier to understand and review.
Keep one message at the center
Give the video one audience and one main takeaway. Remove scenes that introduce a separate topic or do not help explain the central idea.
Explain the purpose early
Tell viewers what they will learn or why the subject matters near the beginning. YouTube recommends examining the first 30 seconds in its retention report to see whether the opening matches the expectations created by the title and thumbnail.
Write for listening
Use short sentences, concrete verbs, and natural transitions. Wistia’s explainer video guide recommends concise, conversational writing and notes that many marketing explainers fit within one to two minutes.
Give every visual a job
Use movement to show a process, diagrams to show relationships, and labels to identify unfamiliar objects. Decorative scenes should not compete with the information.
Protect continuity
Keep the same visual style, color direction, subject design, terminology, and narration tone across scenes. Compare adjacent scenes as well as individual frames.
Review captions and AI-generated details
Correct subtitle errors and inspect generated visuals for distortions, misleading labels, or inconsistent objects. A polished video can still contain a small detail that needs attention.
Create an Explainer Video with JoggAI
Start with one clear takeaway, then use JoggAI’s AI Explainer Video Maker to turn a topic, URL, document, or PDF into an editable outline and scene-by-scene storyboard. Choose the voice and visual settings, render the video, and review the result before downloading or publishing it.
Create your first AI explainer video with JoggAI.
Frequently Asked Questions
How do I make an explainer video with AI?
Define the audience and takeaway, add a topic or source, generate and edit the outline, review the storyboard, select the voice and visual settings, render, and check the finished video. This creates a clear path from source material to an approved final video.
Can I make an explainer video from a URL or PDF?
Yes. JoggAI supports topic, URL, document, and PDF inputs, including multiple source files. Review the generated outline to make sure the most important information has been included.
Can I edit the outline and individual scenes before rendering?
Yes. You can edit or regenerate the Script Outline and modify or regenerate individual scene scripts before rendering.
How do I keep the visual style and voice consistent?
Choose one animation style and voice, keep terminology and subject descriptions consistent, and compare adjacent storyboard scenes before rendering. Then watch the full video to catch any visual changes that are not obvious in isolation.
How many words fit in a 60–90 second explainer video?
At roughly 150 spoken words per minute, 60–90 seconds holds about 150–225 words. Use fewer words for technical subjects, younger audiences, pauses, or scenes with text that viewers need time to read.
What can I edit after the video is rendered?
Using Edit as new, you can change the text or script, voice, and subtitles while retaining the existing continuous animation. You cannot replace scene media, regenerate an individual image, or change the scene order or duration.
How much does an AI explainer video cost?
The cost depends on the selected model, resolution, duration, and number of scenes. JoggAI shows an estimate before rendering. Check the current JoggAI pricing and the estimate shown for your project.
For a broader comparison of AI tools, freelancers, studios, and agencies, read our explainer video pricing guide.